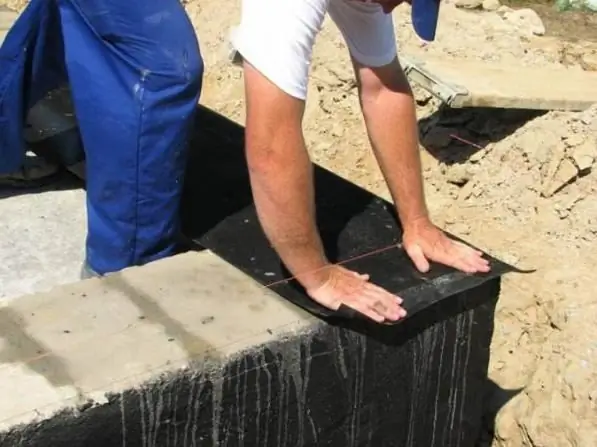
To build a house on a solid foundation, you need to know how to protect the foundation from the damaging effects of moisture. There is a way to do it yourself waterproofing concrete using an affordable and budget material.

Instructions
Step 1
Concrete is a strong but fairly hygroscopic material. If it is not protected from moisture, the processes of stone destruction are activated. After absorbing water, it will be subjected to the forces of compression and expansion, which will occur during the freezing-thawing of the liquid. All this will lead not only to cracking of concrete, but also to the development of corrosion of metal reinforcement bars, with the help of which the reinforcing frame of the foundation was formed.
Step 2
The foundation is built not only from concrete, but also from bricks and building blocks made on the basis of a cement-sand mixture. Any of these materials also need waterproofing. The easiest and most affordable way to protect the base of the house from moisture is to paste over it with sheets of roofing material. Today, there are more modern materials on sale (rubemast). But all of them are more advanced modifications of roofing material. For waterproofing the foundation, it is recommended to buy sheets based on fiberglass, not cardboard. Roofing material on glass fiber has a higher strength and does not shrink.
Step 3
The preparatory process for waterproofing the foundation consists in leveling its walls and sealing (if any) cracks and chips. This work is carried out using a cement-sand mortar. For better adhesion of the binder and laying the roofing material, a flat surface of the concrete tape or slab is required. In addition, the entire area of the foundation intended for pasting with waterproofing material should be cleaned of sand and dirt with a metal brush.
Step 4
The main process is laying roofing material. First, a layer of liquid bitumen or mastic is applied to the concrete. For this, several briquettes of the binder are preheated over a fire. The addition of used machine oil (20-25% of the total volume) to bitumen will increase its adhesive properties. Next, a hot binder composition is applied to the concrete and sheets of roofing material are laid on it. Its canvases must be stacked on top of each other with an overlap of at least 10 cm. The edges of the joints must be coated with hot bitumen and glued together. If the site has a high level of groundwater or swampy soil, it is recommended to protect the concrete from 2-3 layers of water-repellent material.
Step 5
You can also use another option for pasting the foundation with roofing felt: heat its adhesive side with a gas torch or blowtorch. The final stage of waterproofing the foundation is backfilling the foundation pit with soil. This work must be done as carefully as possible so as not to damage the sheets of roofing material with stones.


